
Introduction
In a previous article, I described how you can use MadCap Mimic to create MP4 video demonstrations. In this article, I explain the various ways in which you can incorporate these videos (or indeed any other video in a format supported by HTML5) into your Flare projects, and maximise the responsiveness and "findability" of these videos.
Including HTML5 videos into Flare
The first decision you have to make is where you are going to locate the video file. There are three options:
- Locally hosted: within the Content folder of the Flare project so that it is included as one of the files published by the HTML5 target. The advantage is that the video is under your control and guaranteed to be available to the end user. In addition, this option is likely to result in the fastest page load time of the page containing the video.
- On YouTube or Vimeo: a potential advantage is that both platforms automatically encode your video at various resolutions, which enables users to select their preferred resolution during playback. Also, an increasing number of Internet users choose to search YouTube for solutions to their problems, and posting your videos on YouTube will enable these users to find and view your videos directly (rather than be forced to launch them from your Help).
- Web-based: at another Web location (for example, on your company's web server). Since this means that the video is potentially outside of your control, you will need to be confident that the video is available and that its URL is stable.
Embed or link?
There are two basic ways of making the video available within your Flare content:
- Use Insert > Multimedia > HTML5 Movie to embed the video within a topic amongst other content. The video is then played initially within a small area of page, with the option of switching to full screen. This is probably the way in which you will want users to view videos that you have published to YouTube or Vimeo, and you can use the special players that these platforms provide. You can also embed locally hosted or web-based videos using the standard HTML5 video element.
- Use Insert > Hyperlink to insert a link to the video in its own dedicated topic, or in a new window or tab. This might be a way in which to display a locally hosted or web-based video without the potential distraction of surrounding content.
Embedding a YouTube video
Flare provides an option for easily embedding YouTube videos, and takes care of the required HTML5 code in the output (which includes an iframe element within which the YouTube or Vimeo player is displayed).
You have the option of including width and height values. If you don't, Flare includes 560px x 315px by default. If you do choose to include your own values, make sure you specify both Width and Height, and that these two figures are in the ratio 16:9. If you set the Height to Auto, the height does not adjust automatically to maintain the aspect ratio of the image. Instead, the browser defaults to a height of 150px, and the image appears squashed.
If you are using Flare's Tripane-based HTML5 output, you will find that the full screen option is not available in the player. A fix for this is available on the MadCap Forum.
Embedding a locally hosted video
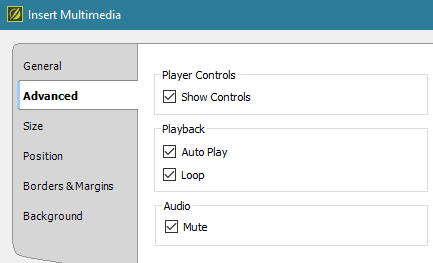
Embedding a local video is easy, and a standard skin for playing the video is provided by the end user's browser. Flare provides various options for customising this skin.
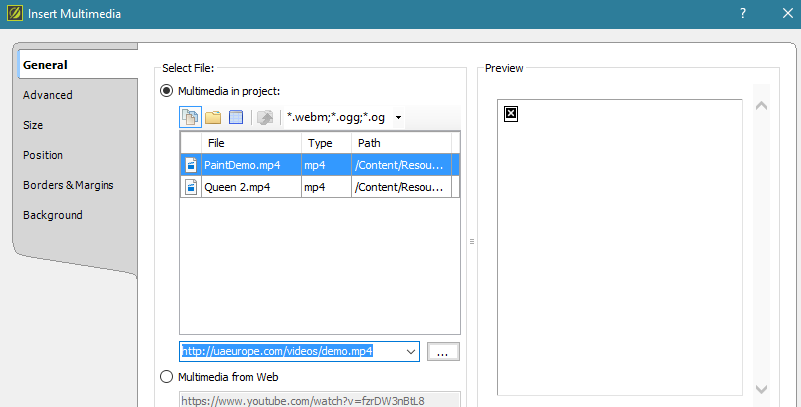
You can also embed a web-based video, although the way of specify the URL of the video using the Insert Multimedia dialog box is somewhat counter-intuitive: you have to select Multimedia in project (Multimedia from Web is only for YouTube or Vimeo videos) then copy and paste the full URL (including http://) into the address field below this option.
Linking to a web-based or local video
I sometimes choose to link from a thumbnail image — this can be a useful way to minimise the space that the video takes up within a topic. If using a Tripane skin, I would recommend linking into a popup window that users can easily dismiss by clicking outside the popup. I also recommend linking directly to the MP4 file (rather than to a topic containing the video), which means that the video is displayed on a black background, centred in the popup, and (most importantly) auto-sized to fit both vertically and horizontally within the pop-up window.
If you are using Flare's Topnav HTML5 skin, then a popup window is not available to you. Instead, I recommend linking to a topic containing the video, and also including a Back link within the topic.
Using the Mimic Movie option
If you are inserting a MadCap Mimic Movie into Flare, you can use the dedicated Multimedia > Mimic Movie option available from the Insert ribbon. The file that you reference from this option is the source (.mimov) file, which means that the actual video (.mp4 or .webm) file needs to be generated by Mimic each time you build your Flare target. As a result, the overall build process can take significantly longer to complete, and it will not be possible to take advantage of the server-side build capability of MadCap Central (since the server would not have access to the source Mimic project). For this reason, I recommend building from Mimic and then linking to the resulting .mp4 or .webm file from Flare using the techniques described in the preceding sections.
Making videos responsive
We want videos to adapt fluidly to the space available within the containing window. You can achieve this for local or web-based videos by setting the maximum width of the video element as a percentage of the available width. Note that, even though an object tag is used within the XML code of the source topic, the generated HTML5 topic uses the video element, so the code you need to include in your style sheet is of this form:
video
{
  max-width: 100%;
}
Searchable videos
Search will target the text in the topic within which the video is embedded or linked. Make sure you use the word "video". You can also add Index Keywords and a Topic Description that will be targeted by Flare's own search (though not by Google).
Call to action
Why not use some of the techniques described in this column to incorporate video demonstrations within your user assistance? You are likely to broaden the appeal of your content, especially amongst the Millennial generation of your users.
Further information
![]()
Training and Consulting in MadCap Flare
UA Europe provides specialist consulting and training (either face-to-face or via the Web) in MadCap Flare.